这是Spring Cloud上手系列的第九篇,代码放在GitHub上,随着本系列文章更新。

Spring Cloud Sleuth

在Spring Cloud应用中,各服务之间存在复杂的调用关系链。Spring Cloud Sleuth主要的功能就是提供服务调用链追踪功能。
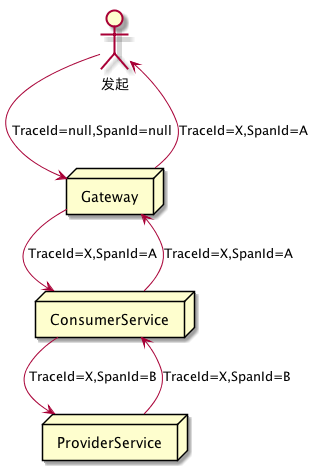
例如,访问gateway/api/consumer/hello端点时,会调用consumer:service/consumer/hello端点,之后调用provider:service/provider/hello端点。在大型系统中,这种调用关系可能会非常复杂,因此需要有机制能对整个调用链进行追踪。

较早提供这种追踪组件的是Google的Dapper链路跟踪组件,于2010年发表了相关论文,相关的文章是实现链路追踪的理论基础。目前,除Dapper外,还有Twitter和Zipkin,阿里的Eagleeye等。

Spring Cloud Sleuth中能方便的集成Zipkin。

相关术语

Spring Cloud Sleuth使用的是Google Dapper的术语。

  • Span: 基本工作单元,发送一个远程调用就会产生一个Span,Span用64位ID唯一标识。

  • Trace: 由一系列Span组成的树状结构。调用一个服务接口时,由这次调用所产生的后续调用都会生成一个新的Span,由所有这些Span组成一个Trace。

  • Annotation: 用来记录事件,有一些核心注解来定义请求的开始和结束。这些注解包括:

    • cs: Client Sent客户端发送请求,表示Span的开始

    • sr: Server Received 服务端获取请求准备开始处理,sr-cs得到的就是网络传输时间

    • ss: Server Sent请求处理的完成时间,ss-sr就是服务器的处理时间

    • cr: Client Received客户端接收响应的时间,cr-cs就是客户端整个请求调用所消耗的时间

服务监控-sleuth

集成Zipkin

集成Zipkin的工作主要有:

  1. 添加zipkin应用,它主要用作ZipkinServer收集调用链数据,并且提供展示。

  2. gatewayprovider:serviceconsumer:service集成zipkin客户端。

  3. 通过gateway访问/api/consumer/hello时,ZpkinServer就能收集到数据。

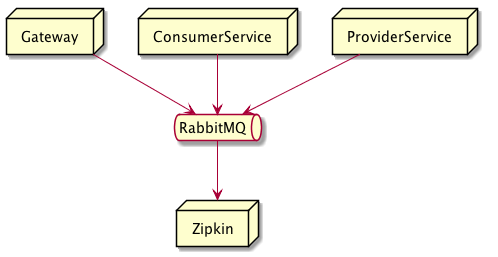
客户端与Zipkin的集成方式主要有两种,一种是通过Http POST数据至Zipkin Server,另一种是通过RabbitMQ接收消息。

网上很多文章都是以Http POST方式通讯的,有一些虽然是通过RabbitMQ,但是却不是针对Edgware版的,很有可能在Edgware版上无法配置成功。这是因为Edgware之前的版本中,需要整合spring-cloud-sleuth-stream,而在Edgware版本中使用的是Zipkin 2.X,它本身就已经支持消息队列,因此spring-cloud-sleuth-stream将被废弃。

另外,在Spring Cloud F版中,Zipkin的工作方式仍会有变化。因为新版本的Zipkin在向独立中间件转变,它会转变成像RabbitMQ这样的独立服务。今后,集成起来将会更简单。

本文不再缀述Http POST方式进行数据传输,只记录如何使用RabbitMQ与Zipkin进行通讯。

服务监控-zipkin-mq

配置依赖

在根模块的build.gradleext.libs中添加zipkin相关依赖:

1
2
3
4
5
6
7
8
9
        //zipkin服务端
        "zipkin-server":"io.zipkin.java:zipkin-server",
        "zipkin-server-ui":"io.zipkin.java:zipkin-autoconfigure-ui",
        "zipkin-server-rabbit":"io.zipkin.java:zipkin-autoconfigure-collector-rabbitmq:2.3.1",

        //zipkin客户端
        "zipkin-client":"org.springframework.cloud:spring-cloud-starter-zipkin",
        "spring-rabbit":"org.springframework.amqp:spring-rabbit"
]

添加Zipkin 服务模块

在根模块下添加zipkin模块,并将它添加至settings.gradle:

1
2
3
4
5
rootProject.name = 'sc-cloud'

include 'registry','gateway','config','zipkin'
include 'provider:api','provider:service'
include 'consumer:api','consumer:service'

zipkin模块的build.gradle中添加依赖,并设置Main-Class:

 1
 2
 3
 4
 5
 6
 7
 8
 9
10
11
12
13
dependencies {
    //ZipKin服务
    compile libs.'zipkin-server'
    compile libs.'zipkin-server-ui'
    compile libs.'zipkin-server-rabbit'
}

jar {
    manifest {
        attributes "Manifest-Version": 1.0,
                'Main-Class': 'com.github.jamsa.sc.zipkin.Application'
    }
}

主类代码如下:

 1
 2
 3
 4
 5
 6
 7
 8
 9
10
11
12
13
14
15
16
package com.github.jamsa.sc.zipkin;

import org.springframework.boot.SpringApplication;
import org.springframework.boot.autoconfigure.SpringBootApplication;
import org.springframework.cloud.netflix.eureka.EnableEurekaClient;
import zipkin.server.EnableZipkinServer;

@SpringBootApplication
@EnableEurekaClient
@EnableZipkinServer
public class Application {
    public static void main(String[] args) {
        SpringApplication.run(Application.class);
    }
}

zipkin应用的application.yml中配置队列相关信息:

 1
 2
 3
 4
 5
 6
 7
 8
 9
10
11
12
13
14
15
16
17
18
19
20
21
22
23
24
25
26
spring:
  application:
    name: sc-zipkin
  rabbitmq:
    host: localhost
    port: 5672
    username: guest
    password: guest

zipkin:
  collector:
    rabbitmq:
      addresses: localhost:5672
      password: guest
      username: guest
      queue: zipkin
server:
  port: 9003
eureka:
  instance:
    hostname: localhost
  client:
    registerWithEureka: false
    fetchRegistry: false
    serviceUrl:
     defaultZone: http://${eureka.instance.hostname}:${server.port}/eureka/

这里指定了zipkin服务使用的队列名称为zipkin,后面zipkin客户端程序中的队列名称需要配置成同样的值。

配置Zipkin 客户端工程

为获取上面图中gateway-consumer-provider的调用链信息,我们需要将gatewayconsumer:serviceprovider:service这几个模块配置为zipkin客户端。

为减少配置量,我们把客户端工程的依赖放在根模块的build.gradle中,在subprojects段中设置以下依赖:

 1
 2
 3
 4
 5
 6
 7
 8
 9
10
11
12
13
14
15
16
17
18
19
20
21
22
    if(name=='api'){
        // API类工程的基本依赖
        dependencies {
            compile libs.'spring-web'
        }
    }else{
        // Feign客户端工程的基本依赖
        dependencies {
            compile libs.'feign'
            compile libs.'eureka-client'
            compile libs.'spring-boot-actuator'
            compile libs.'bus'
        }
    }

    // service 和 gateway 工程的依赖,zipkin 客户端
    if(name=='service'||name=='gateway') {
        dependencies {
            compile libs.'zipkin-client'
            compile libs.'spring-rabbit'
        }
    }

然后,在这几个客户端工程的application.ymlbootstrap.yml中添加zipkin相关配置:

1
2
3
4
5
6
7
spring:
  zipkin:
    rabbitmq:
      queue: zipkin
  sleuth:
    sampler:
      percentage: 1.0

这里的spring.sleuth.sampler.percentage是指100%的将链接数据传输给Zipkin服务端,默认值为0.1。这里为了便于查看,我们把它配置为1。实际生产环境上,可以从1开始逐渐的降低。queue属性的值需要与服务端配置的队列名称保持一致。

测试

为了进行集成测试,我们需要启动registrygatewayprovider:serviceconsumer:service模块外,还需要启动rabbitmq。另外,由于此前配置中心一文中provider:service启动时依赖于config模块,因此我们还需要启动config模块。

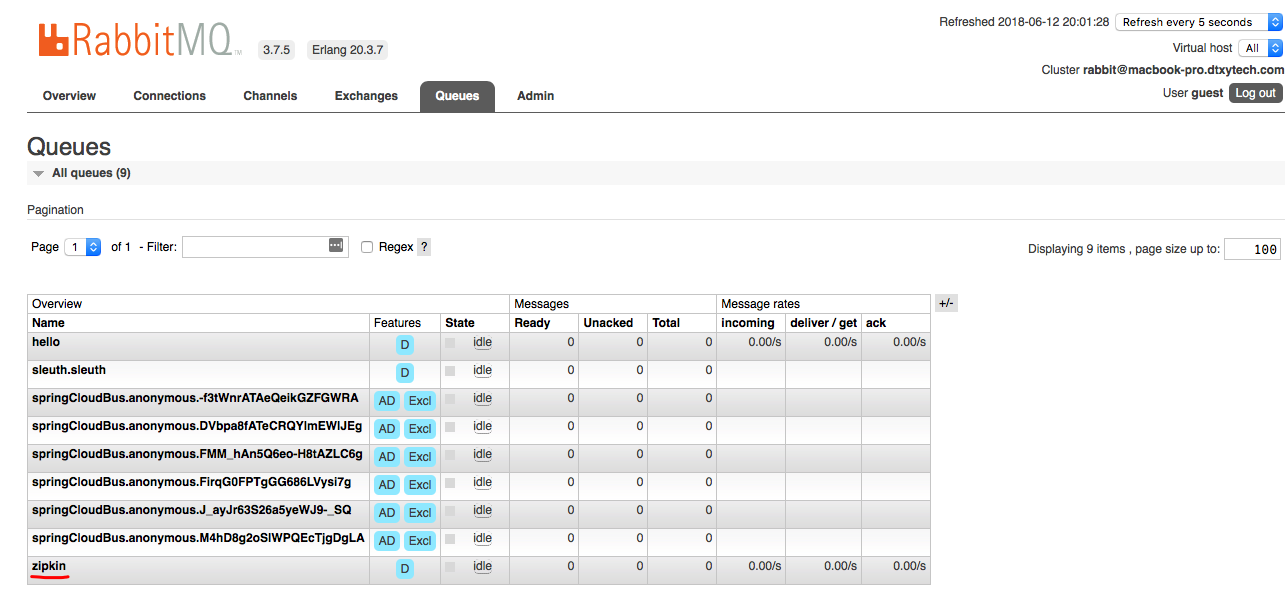
启动完毕后,在Rabbit控制台,能看到新创建的zipkin队列。

服务监控-zipkin-rabbit

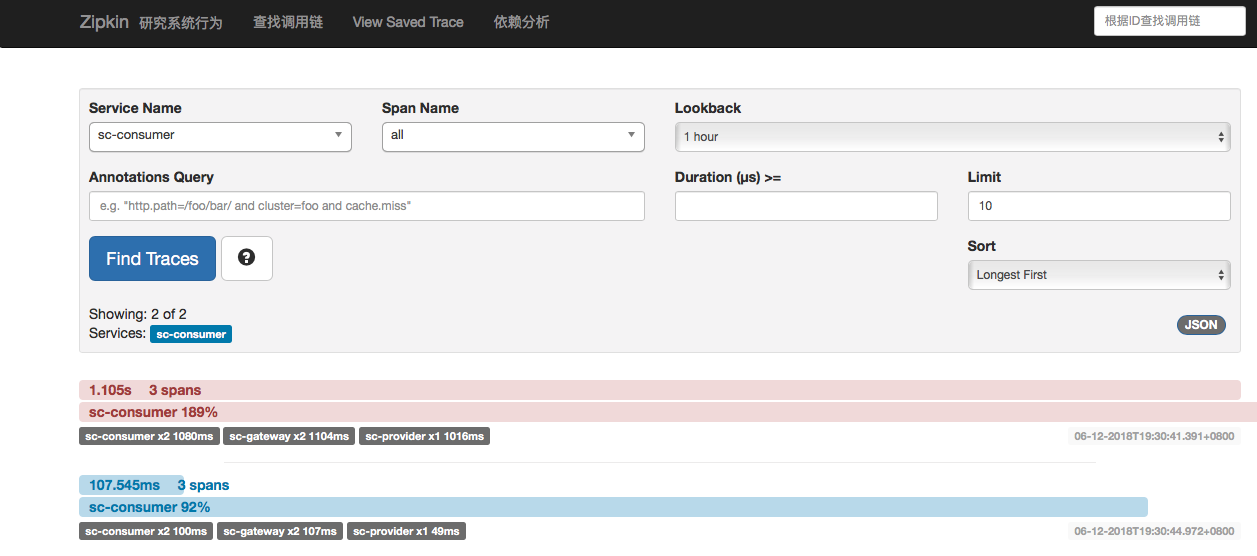
访问http://localhost:9003能看到zipkin服务程序的控制台。

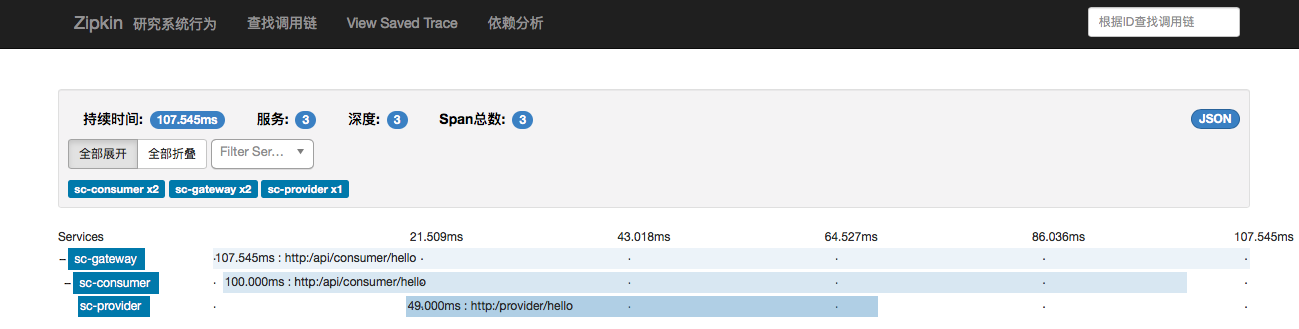
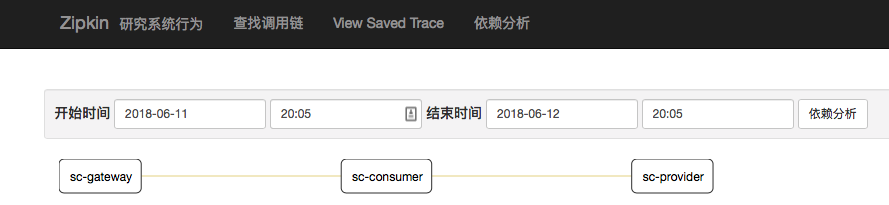
访问http://localhost:9000/api/consumer/hello?name=Jamsa111之后,再查看zipkin控制台,就能看到调用链信息和依赖分析信息了。

服务监控-zipkin1

服务监控-zipkin2

服务监控-zipkin3