这是Spring Cloud上手系列的第七篇,代码放在GitHub上,随着本系列文章更新。

概述

通过Spring Cloud Config可以对各个系统的配置信息进行集中管理和维护。

Spring Cloud Config服务端读取git、svn或本地目录(包括classpath路径)中保存的配置信息。

将Spring Cloud Config服务作为Eureka客户端,则为Config Server提供高可用。Config Client程序可以通过Eureka获取Config Server的信息并读取配置。

Spring Cloud Config Server配置

添加依赖

Spring Config 服务相关的两个依赖是org.springframework.cloud:spring-cloud-config-serverorg.springframework.cloud:spring-cloud-config-client,分别对应于配置服务的服务端和客户端。

我们先在根模块的build.gradle中添加程序库依赖。

 1
 2
 3
 4
 5
 6
 7
 8
 9
10
11
12
//依赖
ext.libs = [
        "spring-cloud":"org.springframework.cloud:spring-cloud-dependencies:${versions.springCloud}",
        "spring-web":"org.springframework:spring-web:${versions.spring}",
        "spring-boot":"org.springframework.boot:spring-boot-starter",
        "eureka-server":"org.springframework.cloud:spring-cloud-starter-netflix-eureka-server",
        "eureka-client":"org.springframework.cloud:spring-cloud-starter-netflix-eureka-client",
        "zuul":"org.springframework.cloud:spring-cloud-starter-netflix-zuul",
        "feign":"org.springframework.cloud:spring-cloud-starter-feign",
        "config-server":"org.springframework.cloud:spring-cloud-config-server",
        "config-client":"org.springframework.cloud:spring-cloud-config-client"
]

添加config模块

在根模块下添加新的config,以它作为Config Server。将这个模块添加至根模块的settings.gradle中。

1
2
3
4
5
rootProject.name = 'sc-cloud'

include 'registry','gateway','config'
include 'provider:api','provider:service'
include 'consumer:api','consumer:service'

config模块自己的build.gradle中添加config-server依赖,并配置好Main-Class

 1
 2
 3
 4
 5
 6
 7
 8
 9
10
11
dependencies {
    compile libs.'config-server'
    compile libs.'eureka-client'
}

jar {
    manifest {
        attributes "Manifest-Version": 1.0,
                'Main-Class': 'com.github.jamsa.sc.config.Application'
    }
}

MainClass

添加配置服务程序的入口类Application:

1
2
3
4
5
6
7
8
@SpringBootApplication
@EnableEurekaClient
@EnableConfigServer
public class Application {
    public static void main(String[] args) {
        SpringApplication.run(Application.class,args);
    }
}

这里我们直接做高可用配置,添加了@EnableEurekaClient注解,这样配置服务的客户端就能通过Eureka注册中心获取配置服务器的信息。

如果不将配置服务注册至Eureka,配置中心的客户端程序仍然能通过完整的URL来访问配置服务。但无法提供高可用支持。

对服务程序进行配置

添加application.yml配置文件。

 1
 2
 3
 4
 5
 6
 7
 8
 9
10
11
12
13
14
15
16
17
18
19
20
21
22
23
24
eureka:
  instance:
    hostname: localhost
  client:
    serviceUrl:
      defaultZone: http://localhost:9001/eureka/
spring:
  application:
    name: sc-config
  profiles:
    active: native #使用本地目录读取配置文件,而不是从版本仓库
  cloud:
    config:
      server:
        native:
          searchLocations:classpath:/config
        git:
          uri: http://xxx.git
          searchPaths: config #配置文件放在根目录时不需要配置
server:
  port: 9002
management:
  security:
    enabled: false

这里将spring.profiles.active配置为native,是为了使用本地目录。spring.cloud.config.server.native是针对native profile的配置,在这个配置文件里可以配置多个profile,由active确定使用哪个profile。可以创建多套不同的profile,分别用于本机开发、测试、生产部署。

添加样例配置文件

根据application.xml中指定的searchLocations,我们在config模块的src/resources目录下添加config目录来保存配置信息。在这个目录下添加以下两个配置文件:

config-for-client-dev.yml

1
2
3
env:
  name:dev
  username:uname for dev

config-for-client-test.properties

1
2
env.name=tet
env.username=uname for test

打包运行配置服务程序

sc-cloud根模块,执行gradle build编译整个工程。然后运行

java -jar config/build/libs/sc-config-0.0.1.jar

启动配置服务程序。

启动完毕后,在Eureka注册中心中可以查看到这个新的服务。

配置中心

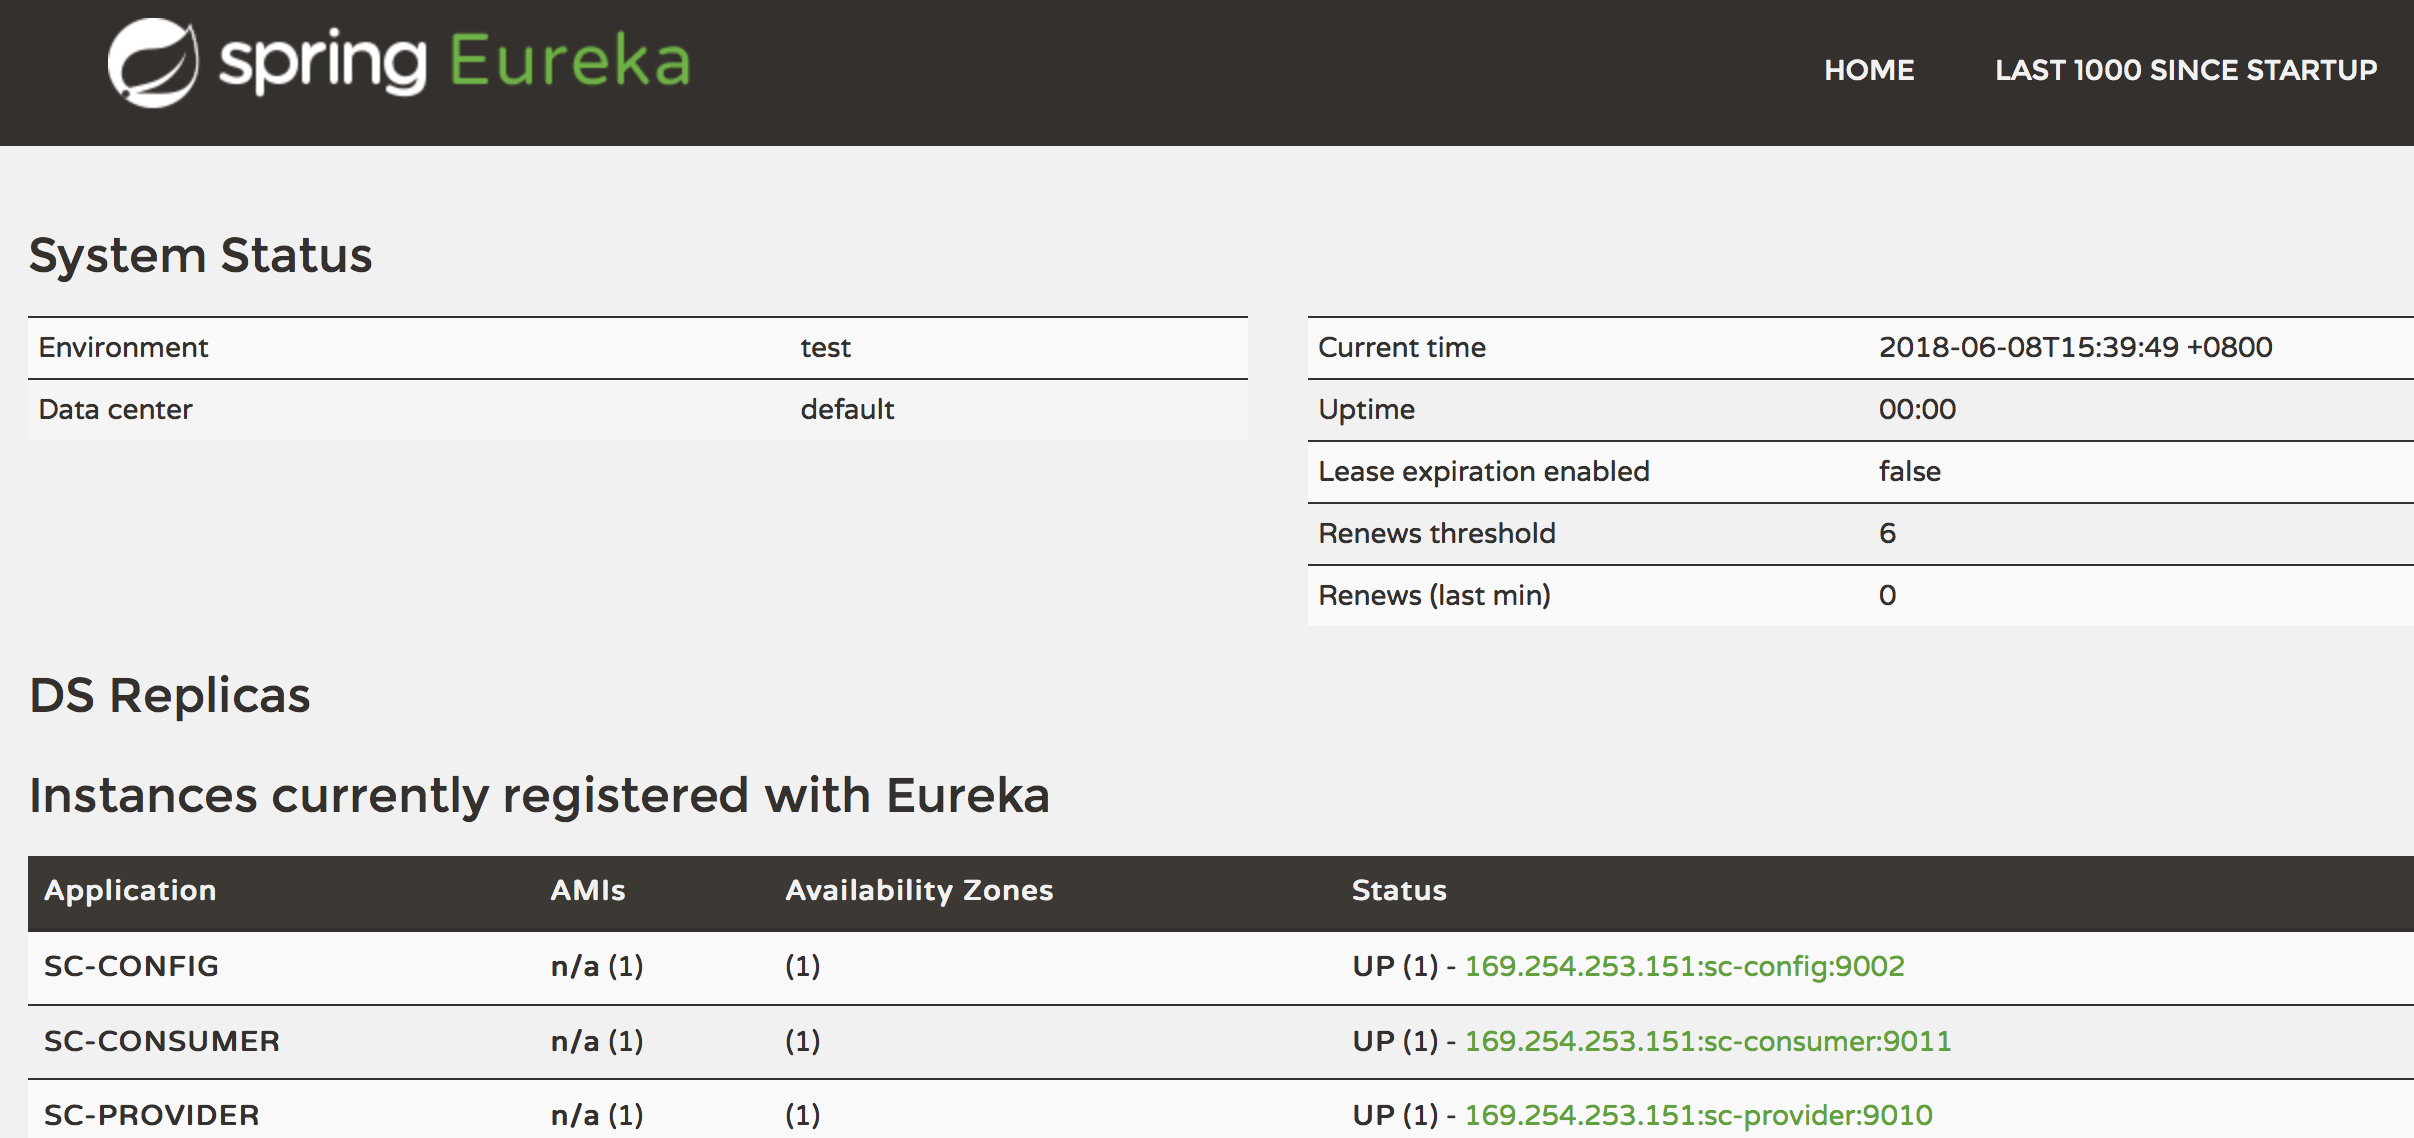
也可以通过http://localhost:9002/config-for-client-dev.ymlhttp://localhost:9002/config-for-client-test.properties访问上节中的配置文件。

配置中心-配置信息dev

配置中心-配置信息test

有几种方式可以访问到这些配置文件:

  • {application}/{profile}[/{label}]
  • {application}-{profile}.yml
  • {label}/{application}-{profile}.yml
  • {application}-{profile}.properties
  • {label}/{application}-{profile}.properties

label是版本库上的分支名称,使用本地文件时,可以用master代替。application是配置文件名,一般将它设置为相应的应用名称,在我们的例子中它是config-for-client。按上述的第一条规则,通过http://localhost:9002/config-for-client/dev/master我们能获取到以下信息:

1
{"name":"config-for-client","profiles":["dev"],"label":"master","version":null,"state":null,"propertySources":[{"name":"classpath:/config/config-for-client-dev.yml","source":{"env":"name:dev username:uname for dev"}}]}

按第五条规则,通过http://localhost:9002/master/config-for-client-dev.properties可以获取到:

1
env: name:dev username:uname for dev

注意这里并不是访问的config-for-client-test.properties,获取到的信息是config-for-client-dev.yml中的内容。

Spring Cloud Config Client配置

接下来配置在provider-serveice工程,为它添加从配置中心读取配置信息的能力。

配置provider-service的依赖

在根模块的build.gradle中添加Spring Cloud Config客户端程序库。

 1
 2
 3
 4
 5
 6
 7
 8
 9
10
11
ext.libs = [
        "spring-cloud":"org.springframework.cloud:spring-cloud-dependencies:${versions.springCloud}",
        "spring-web":"org.springframework:spring-web:${versions.spring}",
        "spring-boot":"org.springframework.boot:spring-boot-starter",
        "eureka-server":"org.springframework.cloud:spring-cloud-starter-netflix-eureka-server",
        "eureka-client":"org.springframework.cloud:spring-cloud-starter-netflix-eureka-client",
        "zuul":"org.springframework.cloud:spring-cloud-starter-netflix-zuul",
        "feign":"org.springframework.cloud:spring-cloud-starter-feign",
        "config-server":"org.springframework.cloud:spring-cloud-config-server",
        "config-client":"org.springframework.cloud:spring-cloud-config-client"
]

provider-service模块的build.gradle中添加config-client依赖。

1
2
3
4
5
dependencies {
    compile project(':provider:api')
    //compile libs.'eureka-client' //Eureka客户端
    compile libs.'config-client' //Config客户端
}

添加测试端点

sc-providerProviderController中添加从配置中心读取配置信息的测试端点。

1
2
3
4
5
6
7
    @Value("${sc.provider.defaultUser: defaultName not found}")
    private String defaultName;

    @RequestMapping("/provider/config")
    public String config(){
        return defaultName;
    }

通过/provider/config可以读取到defaultName属性,这个属性的值来源于配置中心配置文件中的sc.provider.defaultUser,如果读取不到配置中心的值,则取默认值defaultName not found

调整配置文件

主要是添加配置中心相关的配置信息,让provider-service从配置中心读取配置。这里有个较大的调整是需要将配置中心相关的配置信息移到bootstrap.yml中,否则,应用在启动的时候会显示从http://localhost:8888中加载配置。

这是因为bootstrap.yml配置信息先于application.yml加载,特别是在使用配置中心时,需要将相关的注册中心、配置中心的信息放在bootstrap.yml中。参见官方文档

调整完后的bootstrap.yml:

 1
 2
 3
 4
 5
 6
 7
 8
 9
10
11
12
13
14
15
16
17
18
19
20
21
spring:
  application:
    name: sc-provider
  cloud:
    config:
      discovery:
        serviceId: sc-config #配置服务中心的应用名称
        enabled: true
      enabled: true
      profile: dev
      label: master

server:
  port: 9010
eureka:
  instance:
    hostname: localhost
  client:
    serviceUrl:
      defaultZone: http://localhost:9001/eureka/
      

application.yml:

1
2
3
4
5
6
7
8
9
#取消权限验证
management:
  security:
    enabled: false

# 启用/restart端点重新启动应用程序上下文。
endpoints:
  restart:
    enabled: true

添加测试配置文件

config应用的resources/config/目录下添加sc-provider-dev.yml配置文件,默认情况下配置中心客户端应用,会从配置中心按应用名称和profile读取配置文件,因此,这里的文件被命名为sc-provider-dev,即sc-providerdev profile的配置文件。

配置文件内容如下:

1
2
3
sc:
  provider:
    defaultUser: Jamsa

编译和测试

sc-cloud根模块下执行gradle build,编译所有工程。按以下顺序,在不同的窗口中分别启动:registry、config、provider:service三个应用:

1
2
3
4
5
6
java -jar registry/build/libs/sc-registry-0.0.1.jar

java -jar config/build/libs/sc-config-0.0.1.jar

java -jar provider/service/build/libs/sc-provider-service-0.0.1.jar

在启动provider:service的过程中,显示完Spring Logo后的下一行,就可以看到从配置中心加载的配置信息,如果这里显示的是默认地址localhost:8888,则需要再仔细检查bootstrap.yml中的配置信息了。

配置中心-客户端启动

启动完毕后,从http://localhost:9002/sc-provider-dev.yml检查配置信息是否能正常读取。再从http://localhost:9010/provider/config看是否能显示出配置sc-provider-dev.yml中配置的值。如果显示的值是defaultName not found,那么读取也是失败的,这个值是在从配置中心读取失败后,读取的默认值。

读取快速失败和重试

快速失败

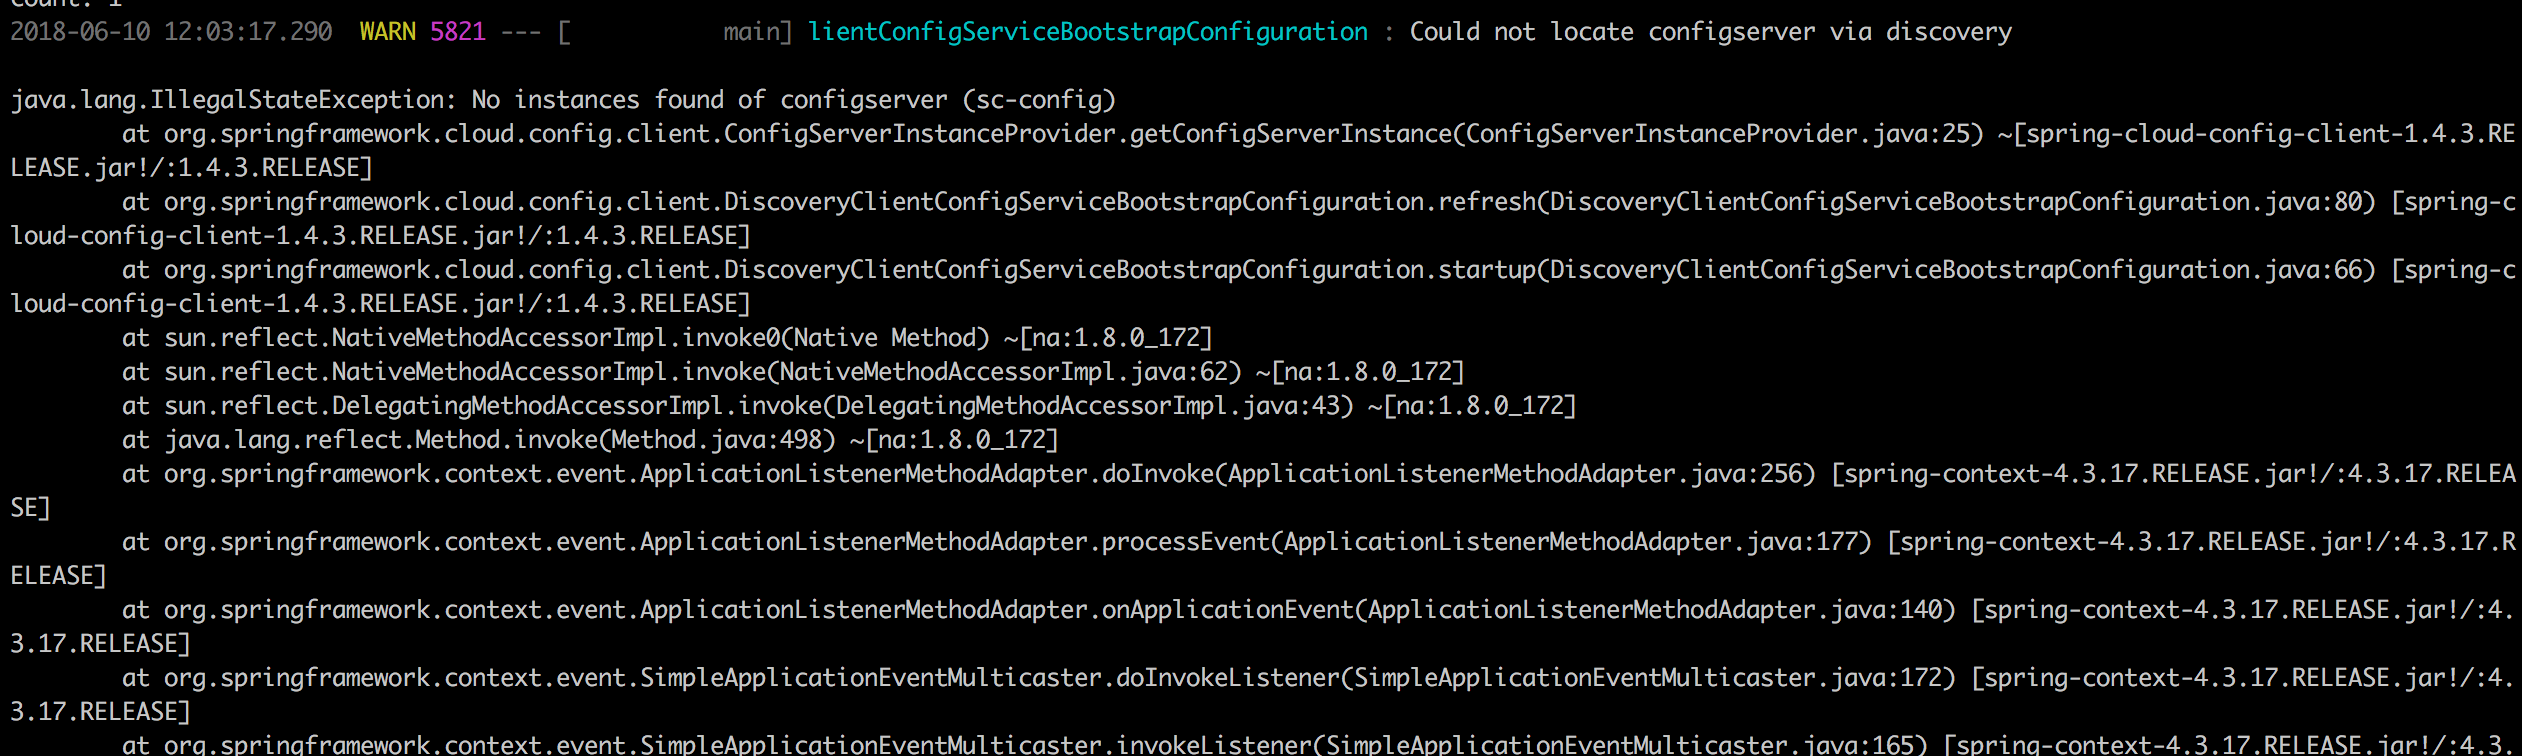
在上一步测试的过程中,可能会因为启动顺序、网络等多种原因,导致provider:service启动时读取配置失败。默认情况下,读取失败并不会导致程序启动报错,有些情况下我们可能需要在从配置中心读取失败时及时给出提示。可以在配置中心客户端程序的bootstrap.yml配置文件中添加spring.cloud.config.failFast=true

添加这项配置后,我们将配置中心应用停掉,并重启provider:service应用,可以看到以下报错信息:

配置中心-客户端failFast

重试读取

当出现这种情况时,更多情况下我们是希望配置中心客户端程序能重试。这时我们可以需要添加spring-retryspring-boot-starter-aop模块来支持重试读取。默认情况下会重试6次,6次后才会返回错误信息。这可以避免因启动顺序或偶发问题产生的配置信息读取失败。

我们需要在根模块的build.gradleext.libs中注册这两个依赖:

1
2
"spring-retry":"org.springframework.retry:spring-retry",
"spring-boot-aop":"org.springframework.boot:spring-boot-starter-aop"

保持provider:service应用的spring.cloud.config.failFast=true,然后在其build.gradle中添加依赖即可,程序本身不需要修改。需要注意的是在Edgware.SR3中,如果应用启动的时候无法连接配置中心,不会像有些文章中提及的那样重试机制会起作用,这个时候重试机制不起作用,应用会直接挂掉。在我验证的过程中,重试机制只在配置中心可连接,但没有响应(发生了不可恢复的异常)的情况下,重试机制才起作用。

1
2
3
4
5
6
7
dependencies {
    compile project(':provider:api')
    //compile libs.'eureka-client' //Eureka客户端
    compile libs.'config-client' //Config客户端
    compile libs.'spring-retry' //重试机制
    compile libs.'spring-boot-aop'
}

配置中心-客户端retry

配置刷新

Actuator监控端点

配置的刷新是通过Spring Boot的监控端点来实现的。到目前为止,我们只有访问http://localhost:9002/beans,即配置服务的监控端点才有响应,这是因为Spring Config Server依赖于actuator,我们不需要显式的添加依赖。对于其它服务,我们需要添加spring-boot-starter-actuator这个依赖。这个依赖除了可以用于刷新配置信息外,还带了很多监控Spring Boot服务状态的端点,因此我们把它添加到根模块的依赖中,并将它应用到除api模块之外的所有应用上。

先调整ext.libs

 1
 2
 3
 4
 5
 6
 7
 8
 9
10
11
12
13
14
ext.libs = [
        "spring-cloud":"org.springframework.cloud:spring-cloud-dependencies:${versions.springCloud}",
        "spring-web":"org.springframework:spring-web:${versions.spring}",
        "spring-boot":"org.springframework.boot:spring-boot-starter",
        "eureka-server":"org.springframework.cloud:spring-cloud-starter-netflix-eureka-server",
        "eureka-client":"org.springframework.cloud:spring-cloud-starter-netflix-eureka-client",
        "zuul":"org.springframework.cloud:spring-cloud-starter-netflix-zuul",
        "feign":"org.springframework.cloud:spring-cloud-starter-feign",
        "config-server":"org.springframework.cloud:spring-cloud-config-server",
        "config-client":"org.springframework.cloud:spring-cloud-config-client",
        "spring-retry":"org.springframework.retry:spring-retry",
        "spring-boot-actuator":"org.springframework.boot:spring-boot-starter-actuator",
        "spring-boot-aop":"org.springframework.boot:spring-boot-starter-aop"
]

自动添加至其它应用:

 1
 2
 3
 4
 5
 6
 7
 8
 9
10
11
12
13
    if(name=='api'){
        // API类工程的基本依赖
        dependencies {
            compile libs.'spring-web'
        }
    }else{
        // Feign客户端工程的基本依赖
        dependencies {
            compile libs.'feign'
            compile libs.'eureka-client'
            compile libs.'spring-boot-actuator'
        }
    }

配置刷新方法

在刷新配置的测试中,由于需要测试修改配置中心的配置文件,我们需要先把配置中心的配置文件移至resources目录的外面。即,将这些文件不进行打包。我们先将config应用的src/main/resources/config目录移至根模块下的support目录下。然后,修改config应用的application.yml配置文件的spring.cloud.config.server.native.searchLocations属性,将它的值修改为file:config目录路径

ProviderController上添加@RefreshScope注解,当配置信息修改之后,我们可以通过发送POST请求至http://localhost:9010/refresh来刷新@Value注解对应的配置信息。在refresh过程中,可以从控制台查看到重新从配置中心获取配置信息的日志。

比如,修改:support/sc-provider-dev.ymlsc.provider.defaultUser的值。之后发送请求至provider:service应用(curl -X POST http://localhost:9010/refresh)。再查看http://localhost:9010/provider/config就能看到新的配置文件值。