这是Spring Cloud上手系列的第八篇,代码放在GitHub上,随着本系列文章更新。

Spring Cloud Bus简介

Spring Cloud Bus以Spring Cloud Stream为基础,建立应用间的通讯通道。消息服务即可用于服务监控,也可以用作应用间的通讯和服务解耦。

将Spring Cloud Bus用于配置中心

前一篇文章的最后一节,我们通过发送POST请求至应用的/refresh端点,可以让应用重新获取配置。如果我们要同时更新所有节点则需要逐个应用发送请求,这样管理起来并不方便。通过集成spring-cloud-starter-bus-amqp可以让我们通过配置中心应用统一管理各个应用配置信息的刷新。

集成之后的配置刷新机制如下图:

配置中心-bus

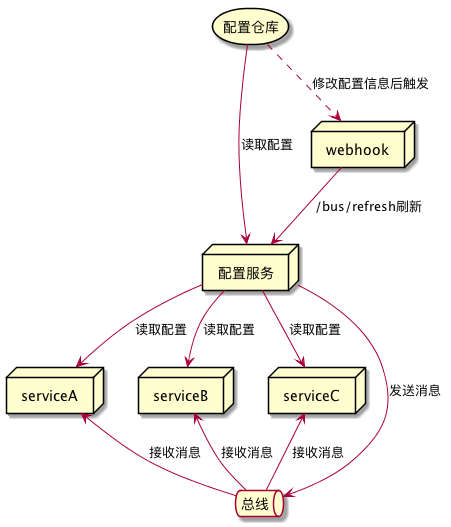
当访问配置中心的/bus/refresh时,它将通过总线发送广播消息。各个客户端接收到消息后,将重新读取配置信息。这样所有配置中心客户端就都能及时获取配置信息的变化。

安装消息中间件

Spring Cloud Bus支持RabbitMQ和Kafka两种服务。这里我们选择RabbitMQ。安装完毕后,默认的服务端口是5672,默认安装会安装管理控制台,管理控制台运行在15672端口。

RabbitMQ

集成消息总线

由于各个应用都有连接配置中心的需要,我们在根模块的build.gradle中添加库和依赖。

ext.libs中添加bus`库:

 1
 2
 3
 4
 5
 6
 7
 8
 9
10
11
12
13
14
15
ext.libs = [
        "spring-cloud":"org.springframework.cloud:spring-cloud-dependencies:${versions.springCloud}",
        "spring-web":"org.springframework:spring-web:${versions.spring}",
        "spring-boot":"org.springframework.boot:spring-boot-starter",
        "eureka-server":"org.springframework.cloud:spring-cloud-starter-netflix-eureka-server",
        "eureka-client":"org.springframework.cloud:spring-cloud-starter-netflix-eureka-client",
        "zuul":"org.springframework.cloud:spring-cloud-starter-netflix-zuul",
        "feign":"org.springframework.cloud:spring-cloud-starter-feign",
        "config-server":"org.springframework.cloud:spring-cloud-config-server",
        "config-client":"org.springframework.cloud:spring-cloud-config-client",
        "spring-retry":"org.springframework.retry:spring-retry",
        "spring-boot-actuator":"org.springframework.boot:spring-boot-starter-actuator",
        "spring-boot-aop":"org.springframework.boot:spring-boot-starter-aop",
        "bus":"org.springframework.cloud:spring-cloud-starter-bus-amqp"
]

添加依赖:

 1
 2
 3
 4
 5
 6
 7
 8
 9
10
11
12
13
14
    if(name=='api'){
        // API类工程的基本依赖
        dependencies {
            compile libs.'spring-web'
        }
    }else{
        // Feign客户端工程的基本依赖
        dependencies {
            compile libs.'feign'
            compile libs.'eureka-client'
            compile libs.'spring-boot-actuator'
            compile libs.'bus'
        }
    }

在配置中心和provider:service应用的配置文件中增加rabbitmq相关的配置信息。

 1
 2
 3
 4
 5
 6
 7
 8
 9
10
spring:
  cloud:
    bus:
      trace:
        enabled: true
  rabbitmq:
    host: localhost
    port: 5672
    username: guest
    password: guest

编译并运行

在根模块中使用gradle build重新编译所有模块。之后运行注册中心、配置中心和provider:service应用。我们就能在provider:service应用的http://localhost:9010/provider/config查看到配置文件中的信息了。

修改配置文件,之后访问配置中心http://localhost:9002/bus/refresh,从控制台中可以看到provider:service重新读取了配置。

再次访问provider:service应用的http://localhost:9010/provider/config可以看到修改后的配置已经生效了。

整个刷新过程中,我们并没有访问provider:servicehttp://localhost:9010/refresh,通过访问配置中心的/bus/refresh就刷新了,provider:service所读取的配置。

自动触发配置更新

如果配置信息是存储在版本库中,还可以通过版本库的hook实现提交时自动发送请求至配置中心/bus/refresh,这样就能实现完全自动的化的配置重新加载。

如果只想更新部分服务的配置信息,可以发送请求至/bus/refresh时添加destination参数。如:/bus/refresh?destination=sc-provider:**,这样将刷新sc-provider的所有应用。如果只想刷新某个服务实例,还可以进一步使用/bus/refresh?destination=sc-provider:9010,只刷新sc-provider:9010这个实例。

总线事件跟踪

如果想了解总线上的事件是怎样传播的,只需要设置spring.bus.trace.enabled=true。在访问配置中心的/bus/refresh之后,访问配置中心的/trace端点就能看到如下结果:

  1
  2
  3
  4
  5
  6
  7
  8
  9
 10
 11
 12
 13
 14
 15
 16
 17
 18
 19
 20
 21
 22
 23
 24
 25
 26
 27
 28
 29
 30
 31
 32
 33
 34
 35
 36
 37
 38
 39
 40
 41
 42
 43
 44
 45
 46
 47
 48
 49
 50
 51
 52
 53
 54
 55
 56
 57
 58
 59
 60
 61
 62
 63
 64
 65
 66
 67
 68
 69
 70
 71
 72
 73
 74
 75
 76
 77
 78
 79
 80
 81
 82
 83
 84
 85
 86
 87
 88
 89
 90
 91
 92
 93
 94
 95
 96
 97
 98
 99
100
101
102
103
104
105
106
107
108
109
110
111
112
113
114
115
116
117
118
119
120
121
122
123
124
125
126
127
128
129
130
[
    {
        "timestamp": "2018-06-11T15:55:48.092+0000",
        "info": {
            "signal": "spring.cloud.bus.ack",
            "event": "RefreshRemoteApplicationEvent",
            "id": "39ca8e1f-ffbc-4f2d-881e-07f28ca1809b",
            "origin": "sc-provider:9010",
            "destination": "**"
        }
    },
    {
        "timestamp": "2018-06-11T15:55:47.832+0000",
        "info": {
            "method": "POST",
            "path": "/bus/refresh",
            "headers": {
                "request": {
                    "host": "localhost:9002",
                    "user-agent": "curl/7.54.0",
                    "accept": "*/*"
                },
                "response": {
                    "X-Application-Context": "sc-config:native:9002",
                    "status": "200"
                }
            },
            "timeTaken": "5545"
        }
    },
    {
        "timestamp": "2018-06-11T15:55:47.827+0000",
        "info": {
            "signal": "spring.cloud.bus.ack",
            "event": "RefreshRemoteApplicationEvent",
            "id": "39ca8e1f-ffbc-4f2d-881e-07f28ca1809b",
            "origin": "sc-consumer:9011",
            "destination": "**"
        }
    },
    {
        "timestamp": "2018-06-11T15:55:45.570+0000",
        "info": {
            "method": "GET",
            "path": "/sc-provider/dev/master",
            "headers": {
                "request": {
                    "accept": "application/json, application/*+json",
                    "user-agent": "Java/1.8.0_172",
                    "host": "localhost:9002",
                    "connection": "keep-alive"
                },
                "response": {
                    "X-Application-Context": "sc-config:native:9002",
                    "Content-Type": "application/json;charset=UTF-8",
                    "Transfer-Encoding": "chunked",
                    "Date": "Mon, 11 Jun 2018 15:55:45 GMT",
                    "status": "200"
                }
            },
            "timeTaken": "828"
        }
    },
    {
        "timestamp": "2018-06-11T15:55:42.539+0000",
        "info": {
            "signal": "spring.cloud.bus.sent",
            "type": "RefreshRemoteApplicationEvent",
            "id": "39ca8e1f-ffbc-4f2d-881e-07f28ca1809b",
            "origin": "sc-config:native:9002",
            "destination": "**:**"
        }
    },
    {
        "timestamp": "2018-06-11T15:55:42.537+0000",
        "info": {
            "signal": "spring.cloud.bus.ack",
            "event": "RefreshRemoteApplicationEvent",
            "id": "39ca8e1f-ffbc-4f2d-881e-07f28ca1809b",
            "origin": "sc-config:native:9002",
            "destination": "**"
        }
    },
    {
        "timestamp": "2018-06-11T15:55:37.624+0000",
        "info": {
            "method": "GET",
            "path": "/sc-provider/dev/master",
            "headers": {
                "request": {
                    "accept": "application/json, application/*+json",
                    "user-agent": "Java/1.8.0_172",
                    "host": "localhost:9002",
                    "connection": "keep-alive"
                },
                "response": {
                    "X-Application-Context": "sc-config:native:9002",
                    "Content-Type": "application/json;charset=UTF-8",
                    "Transfer-Encoding": "chunked",
                    "Date": "Mon, 11 Jun 2018 15:55:37 GMT",
                    "status": "200"
                }
            },
            "timeTaken": "691"
        }
    },
    {
        "timestamp": "2018-06-11T15:55:22.168+0000",
        "info": {
            "method": "GET",
            "path": "/sc-provider/dev/master",
            "headers": {
                "request": {
                    "accept": "application/json, application/*+json",
                    "user-agent": "Java/1.8.0_172",
                    "host": "localhost:9002",
                    "connection": "keep-alive"
                },
                "response": {
                    "X-Application-Context": "sc-config:native:9002",
                    "Content-Type": "application/json;charset=UTF-8",
                    "Transfer-Encoding": "chunked",
                    "Date": "Mon, 11 Jun 2018 15:55:22 GMT",
                    "status": "200"
                }
            },
            "timeTaken": "615"
        }
    }
]

从这些日志中可以看到配置中心发出的RefreshRemoteApplicationEvent事件被广播,配置中心客户端接受了这个事件,并重新读取了配置信息。

在总线上传递自定义消息

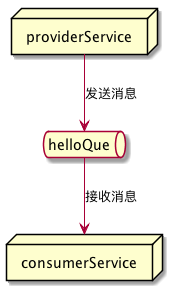
消息总线除了可以用于配置中心外,还可以处理我们自己的数据。下面我们测试从provider:service产生消息,在consumer:service中消费这条消息,使用的队列名称为hello

自定义消息-bus

provider:service中配置消息生产者

添加Config配置类,在其中配置hello队列:

1
2
3
4
5
6
7
8
9
@Configuration
public class Config {

    //名为hello的队列
    @Bean
    public Queue helloQueue(){
        return new Queue("hello");
    }
}

添加Sender类,由它负责发送消息:

 1
 2
 3
 4
 5
 6
 7
 8
 9
10
11
12
13
14
15
@Component
public class Sender {
    @Autowired
    private AmqpTemplate amqpTemplate;

    /**
     * 发送消息至hello队列
     */
    public void send(){
        String message = "hello "+new Date();
        System.out.println("发送消息:"+message);
        amqpTemplate.convertAndSend("hello",message);

    }
}

ProviderController中增加/provider/send端点,用于发送消息。

1
2
3
4
5
6
7
    @Autowired
    private Sender sender;

    @RequestMapping("/provider/send")
    public void send(){
        this.sender.send();
    }

consumer:service中配置消息消费者

添加消息接收类:

1
2
3
4
5
6
7
8
9
@Component
@RabbitListener(queues = "hello")
public class Receiver {

    @RabbitHandler
    public void process(String hello){
        System.out.println("接收到消息:"+hello);
    }
}

编译并运行程序

启动注册中心、配置中心、provider:serviceconsumer:service四个应用。

访问provider:service/provider/send来发送消息。从控制台可以看到消息发出:

bus-sender

consumer:service的控制台,可以看到消费方获取到的消息。

bus-receiver

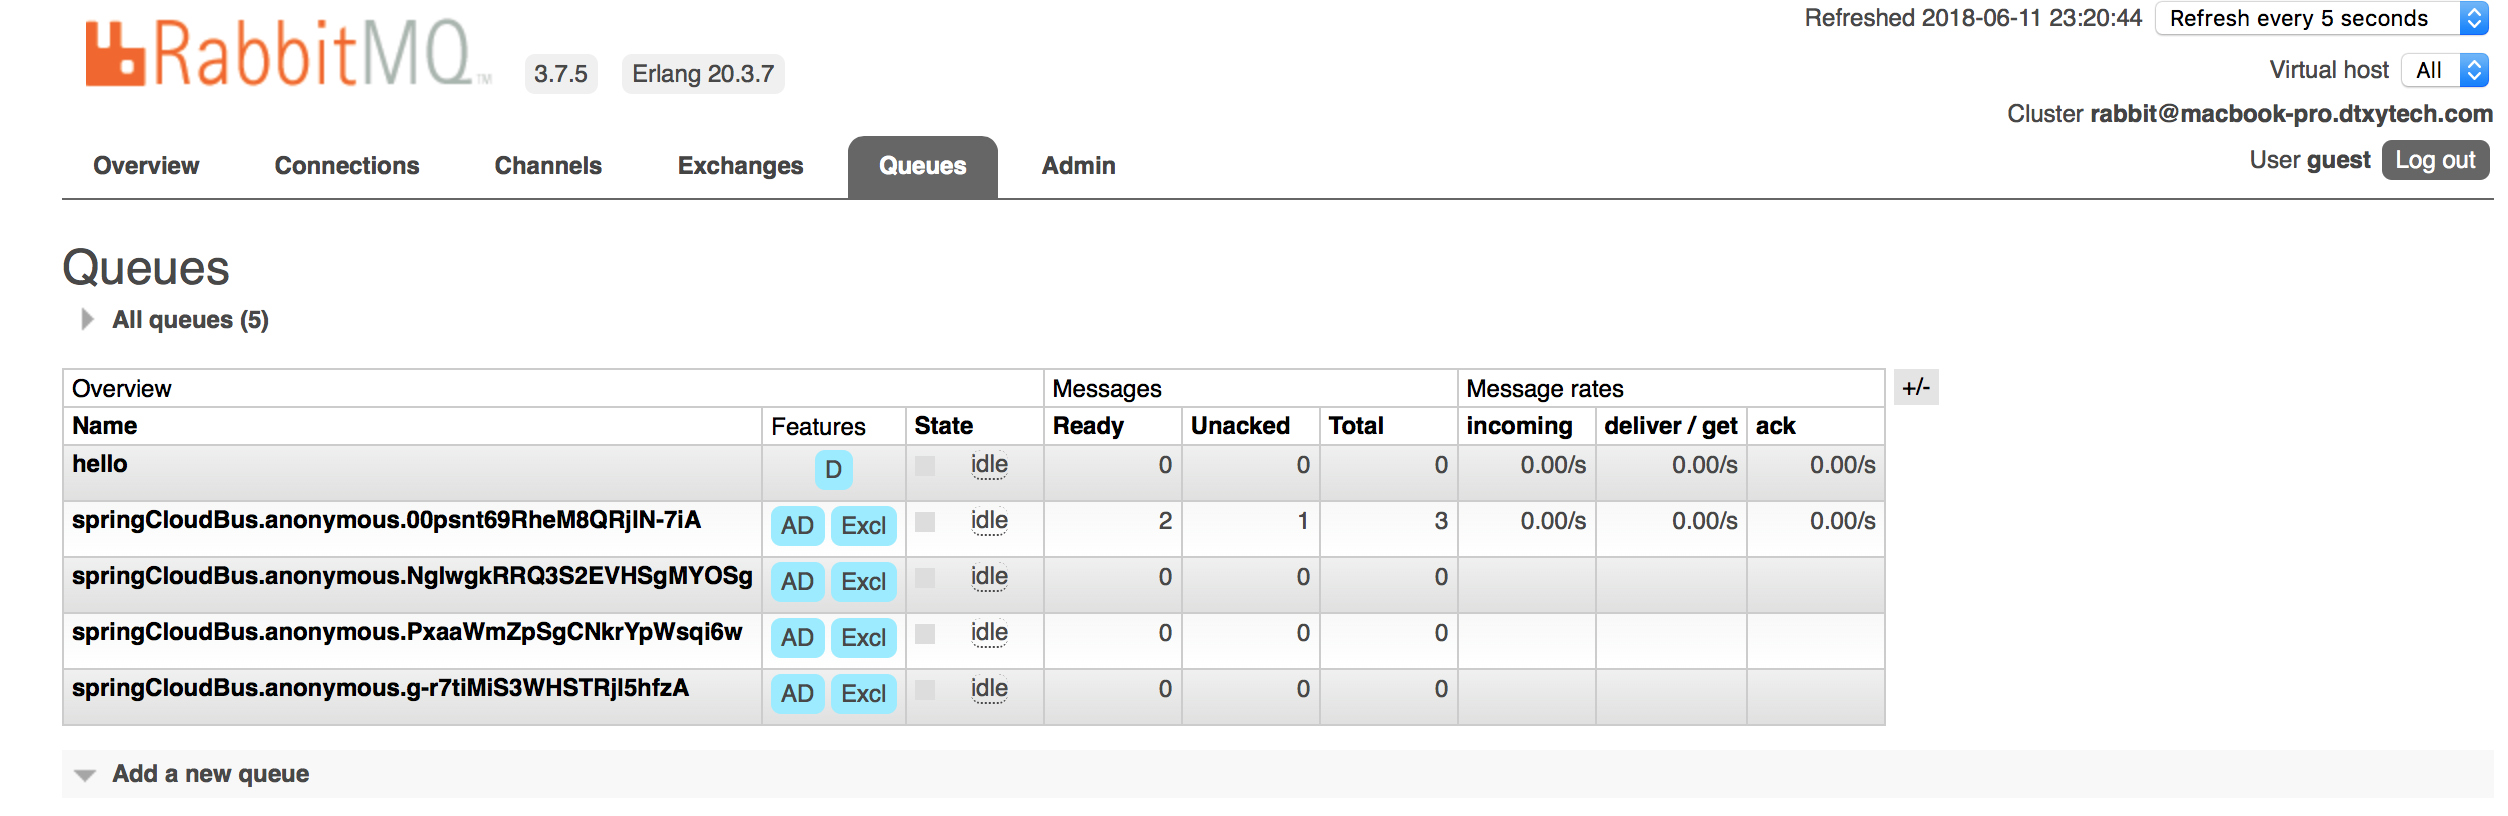
从RabbitMQ控制台也能看到hello队列的情况。

rabbitmq-que